Gas Cylinder Safety, Part II: Setup and Use
LCGC North America
This month's “GC Connections” continues the discussion of procedures for safe setup, use, and disposal of compressed gas cylinders in the chromatographic lab.
This month’s “GC Connections” continues the discussion of procedures for safe setup, use, and disposal of compressed gas cylinders in the chromatography laboratory.
Compressed gases are the unavoidable companions to gas chromatography (GC). To attain large stored gas volumes that will last for a sufficient period, gas suppliers sell compressed gases for GC use in a variety of high-pressure cylinders. Pressure regulators act as the intermediaries between cylinder pressures and levels compatible with instrumentation. With internal pressures that can exceed 18 mPa (2600 psig), these cylinders present a rapid decompression hazard as well as flammability, asphyxiation, toxicity, and cryohazards. Laboratories that use compressed gas cylinders must implement proper storage, transport, handling, installation, and disposal procedures as well as appropriate emergency plans. All lab personnel and any others who may encounter compressed gas cylinders must receive proper training in these procedures.
The first step toward the safe use of gas cylinders in the laboratory is their restraint in place. The selection and installation of appropriate pressure regulators, fittings, and tubing between the cylinders, the gas supply filters, and the GC gas inlets are critical for successful gas safety as well as for high GC performance. After they are operational, gas cylinders require occasional monitoring of the remaining gas pressure until it drops below a useful level. Then, it’s time to disconnect the pressure regulator, return the used tank, and install a full one. In this article, I examine these issues in detail. Gas filters are a separate consideration that is beyond the space limits of this “GC Connections” installment.
In part I of this series, I discussed fundamental issues of gas cylinder hazards and provided common-sense precautions that every laboratory should implement (1). I also presented a nightmare gas-handling scenario in the form of an imaginary video script. There were at least 12 hazardous actions, as I count them. If any readers are interested, please go back to that issue and see if you can find additional dangerous items. You can email me at lcgcedit@ubm.com with your findings, and I will publish the list early in 2017.
Hooking Up
The most important steps toward safe and effective use of compressed gas cylinders are installing and setting up the cylinder, the associated regulator, and the connecting tubing.
Cylinder Transport and Restraint
Most cylinder accidents occur during transport or are due to improper restraint, as the imaginary lab scenario from part I illustrated (1). By taking a few simple precautions and following some guidelines, GC operators can prevent all accidents of this type. Although proper cylinder handling does take a few minutes longer than other approaches, the time spent is a necessary cost for attaining the safest possible laboratory environment.
Cylinder Transport
Never leave a cylinder standing unrestrained, even temporarily while it’s being replaced or installed. A dual-cylinder cart is handy when exchanging cylinders. Bring the new cylinder on the cart to its location, secure the used cylinder on the cart in the free position, and only then remove the new cylinder and install it. And of course, no one should try to roll a cylinder on its bottom edge any significant distance across the floor. It’s necessary to do so to move a cylinder between its restraint and a cart, but that’s the limit. It’s also a good idea to wear heavy gloves when moving cylinders. They will keep your hands clean as well as protect them from minor injuries such as getting fingers stuck between two cylinders or getting a cut from a sharp metallic edge on a pressure fitting or cylinder cap.
Restraint
Each gas cylinder must be properly restrained to a fixed object such as a permanently installed bench or the wall of the laboratory. Gas suppliers and other GC supply companies offer a variety of cylinder restraints for different situations. For a temporary setup, cylinder bench clamps are easily installed and removed; they may accommodate one or more cylinders. Wall-mounted restraints with chains or straps can be used for more-permanent installations. Larger cages and racks also are available. In any case, the objective is to restrain the cylinders so they cannot be tipped over or damaged while in place. The restraining straps or chain must be adjusted tightly around the cylinders at the proper height. If the restraints are too low, the cylinders may tip over; if they are too high, the cylinder might slip under the restraints.
Cylinder Caps
Cylinder caps are designed to protect the cylinder valve and prevent sudden decompression in the event that the cylinder falls or is hit by something. The cylinder cap should remain in place on the cylinder at all times, except when the cylinder is attached to a regulator and in service. Always attach the cylinder cap before freeing cylinders from their restraints. Store the caps in plain sight immediately next to the cylinders as a reminder to use them.
Multiple Cylinders
If multiple cylinders are restrained by one device, extreme care must be taken not to lose control of any cylinders when installing or removing one. It’s best to shut off all the cylinders’ high-pressure valves before loosening the restraints. If a cylinder that is attached to a regulator must be moved out of the way, the regulator should be detached from the cylinder (see below for a discussion of this procedure) and the cylinder cap should be installed before moving it.
Regulators
Proper regulator selection ensures the safety, purity, flow rate, and pressure stability of gases delivered to an instrument. In general, most GC gas streams require a dual-stage regulator. I highly recommend dual-stage stainless steel high-purity regulators for carrier gas as well as makeup or other working gas supplies for sensitive detectors such as electron-capture detectors or mass spectrometers. They are well worth the extra cost. A high-purity regulator has been specially cleaned and contains noncontaminating materials that don’t contribute extraneous substances to the gas stream. They also do a better job of preventing atmospheric gases from diffusing into the gas stream.
Cylinder Fittings
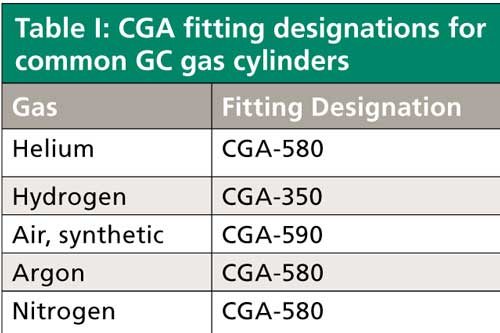
In the United States, gas cylinder pressure regulators follow a uniform convention, which is promulgated by the Compressed Gas Association (CGA) (2), for the types of high-pressure fittings that connect to gas cylinders. The fittings are designed so that incompatible gas cylinders cannot be connected to the same regulator-hydrogen, air, and carrier gases have different fittings. Table I lists the common GC gases and corresponding CGA fitting designations. Other gases that are not normally encountered in GC, such as oxygen or acetylene, also have unique cylinder fittings that effectively prevent cross-use of regulators.

Never attempt to change the high-pressure cylinder fitting on a regulator or use an adapter in an effort to make one regulator work with gases other than those for which it was originally placed in service. For GC use, this can result in gas line contamination. With reactive gases the result can be much worse. For example, oxygen regulators are specially cleaned to avoid internal combustion of oxidizable contaminants. A nonoxygen regulator pressed into oxygen service quickly can cause an explosion or fire.
Regulator Installation
To install a regulator safely on a high-pressure gas cylinder, first check the cylinder gas designation and ensure that the cylinder CGA fitting matches that of the regulator. Next, check the gas fitting seat in the cylinder for particulate or other contamination. If necessary, blow out the fitting with clean, dry compressed air. Never crack open the high-pressure cylinder valve in an attempt to clean the fitting seat-it’s a very dangerous procedure that can result in injury. Remember that some fittings screw on counterclockwise, and then thread the gas fittings together until finger tight, then use a 12- or 15-in. wrench to securely tighten the regulator to the cylinder. Take some care that the wrench does not contact the cylinder valve. Don’t use a larger wrench-the extra torque might deform the fittings. As with swaged fittings, apply no sealing or lubricating material to the cylinder or regulator fittings.
Unscrew the pressure adjustment knob until the internal spring is no longer compressed, and ensure that the regulator outlet valve is closed, if one is installed. An outlet valve serves to prevent air from leaking from an open regulator into the gas lines, and is a necessity for most GC gases. An additional in-line purge valve is useful for purging air from a reconnected gas line.
Face the gas cylinder with the pressure regulator positioned on the side opposite to you, slowly open the high pressure cylinder valve, and allow the internal pressure to build up slowly in the regulator. Shut the valve immediately if an audible gas leak occurs. For gases other than air or nitrogen, use an electronic leak detector around the high-pressure fitting, the regulator gauge, and the cylinder shut-off valve to ensure there are no leaks.
Regulator Testing
Gas regulators have a finite lifetime. Most regulators will last for years with normal GC use, but each regulator should be tested upon installation and periodically after that to identify potential premature failure.
To test a regulator, first check the high-pressure gauge-it should read between 1800 and 2600 psig (12–18 mPa) for a new cylinder, depending on the type of cylinder and gas. If the gauge reading is very low, then the cylinder is not full or the gauge is defective. In this case, the best procedure is to temporarily install another suitable regulator to check the cylinder pressure. If necessary, replace the cylinder or the defective regulator. Never try to replace a gauge on a regulator or to repair any other regulator component. Only a regulator manufacturer can do that.
Next, observe the outlet pressure gauge for a few minutes, with the outlet valve closed. There should be no observable pressure increase. If the outlet pressure does go up when the pressure adjustment is fully withdrawn, then the regulator has a leak from the high-pressure side and must be returned to the manufacturer for repair or replacement. To complete checking the high-pressure side, close the cylinder valve and wait 2 min-the high-pressure gauge indication should not decrease. Any loss of high pressure with the cylinder valve closed also indicates a leak that will require repair or replacement.
Now, with the outlet valve still closed, re-open the high-pressure cylinder valve completely. Adjust the regulator outlet pressure to its operating level, which usually lies between 40 and 90 psig (275–600 kPa) for GC gases. If the outlet pressure gauge rises quickly to a high pressure, or if the gauge fails to attain the desired level despite increasing the pressure adjustment, shut off the cylinder valve and replace the regulator.
At this point an in-line purge valve can be used to bleed out any air that may have entered the regulator. Open the outlet valve slowly and pressurize the connecting tubing. The outlet pressure gauge may drop momentarily, but it should settle back quickly to its set point. Allow a few seconds to bleed gas from the purge valve, if one is used, and then close it. As a last step, I check the dynamic operation of a regulator by momentarily shutting off the cylinder valve while the regulator is delivering flow. The high-pressure gauge will start to drop as the gas is consumed, but the outlet pressure should be nearly steady as long as at least 2–3 times the outlet pressure remains on the high-pressure side. Restore the cylinder valve to its fully open position. Sometimes it is convenient to run this test while waiting for the gas lines to be purged of any small amount of air that entered during installation.
Tubing and Fittings
As with all components in the GC supply gas stream, the connecting tubing and fittings need to be free of contaminants and leaks, and they must be rated to withstand the highest possible pressure to which they could be subjected in the event of pressure regulator failure. A good figure of merit to use is at least twice the opening pressure of the safety relief valve in the downstream pressure side of the regulator, which will be greater than the highest outlet pressure the regulator is designed to deliver. Even so, higher-pressure transients are possible with failure of the high-pressure side of the regulator, until the contents of the cylinder have been vented.
Plastic Tubing
For the above reasons, GC installations should never use polymeric tubing or plastic fittings. Although such materials are suitable for many liquid chromatography (LC) applications, they are not suitable for GC use for three reasons. First, polymeric materials may contaminate the gas stream. Atmospheric gases, namely water and oxygen, may diffuse into the gas stream, and the tubing can emit traces of plasticizers. Second, polymeric tubing and fittings may fail and burst at high pressures. And third, when routed behind a GC instrument, polymeric tubing and fittings may be exposed to the high-temperature air exhaust from a GC oven that is cooling down, which could cause an immediate tubing failure or at least weaken a section of the tubing.
Aluminum Tubing
I’ve seen a few installations that use aluminum tubing, but this is not a suitable choice. Although aluminum possibly is less expensive than copper or stainless steel, it lacks the ductility of other available metal tubing, and it will rapidly develop metal fatigue cracks and failures unless it is mechanically constrained. The majority of GC gas supply installations will flex the connecting tubing during tank changes, and with some GC systems the external connecting tubing is flexed when the top cover is lifted. In addition, aluminum tubing does not fare well in swaged fittings that must be disconnected and remade.
Copper Tubing
Copper is by far the most commonly used GC tubing material. Rolls of specially cleaned copper tubing are readily available from GC manufacturers and supply houses: they are the most convenient way to obtain suitable material. Copper tubing withstands the kind of flexing encountered in normal GC use. It can be uncoiled and coiled again easily for storage, and swaged fittings on copper tubing can be remade many times, if the operator is careful not to over-tighten the fitting and distort the threads or ferrules. Copper tubing is best cut with a rotary blade tool designed for that purpose, which can be purchased from any tool supply company. Never use a manual saw, pliers, or diagonal cutters to cut tubing for GC purposes, and never try to flex the tubing until it breaks from fatigue.
Stainless Steel Tubing
Many GC users prefer stainless steel tubing for critical applications. It is more rigid than copper, and its spring properties allow it to better withstand limited flexing. Because of its hardness, however, stainless steel is more susceptible to leaks from minor imperfections on swaged fitting sealing surfaces. Stainless steel is more difficult to cut properly; it will quickly dull the rotary-type tools that can be used with copper. Instead, use a high-speed cut-off saw or other tool designed for use with stainless steel. Specialized deburring and dressing tools will prepare tubing ends that are square and free of scratches. Afterwards, the tubing must be flushed with clean solvent to remove particulate residue and then thoroughly dried.
Fittings
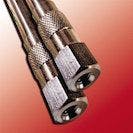
Always use swage-type fittings for GC applications. Quick disconnects, soldered, and pipe compression or flared fittings are unsuitable. Permanently installed stainless steel tubing can be welded, but it is more convenient to use discrete fittings instead for the smaller tubing sizes commonly encountered in GC.
Several manufacturers supply swaged fittings for GC applications. The use of one brand or another is largely a matter of personal preference, prior experience, and perhaps most significantly, what type of fittings are on hand or already in use. Never mix ferrules, nuts, and fittings of different manufacturers unless the supplier specifically states that their product is compatible with another: The only result will be a leaking connection. It’s a good idea to keep only one type of swaged fitting on hand to avoid a mix-up.
Try to match the fitting and tubing materials. The easiest rule to remember is to match the color of the ferrule, fitting, and tubing. Use stainless steel for stainless tubing and brass for copper tubing. Brass fittings will also work with stainless steel because the softer brass ferrules will deform and make a seal, but this arrangement may fail when remade several times. Stainless steel ferrules will not work as well with copper tubing because the ferrule will tend to crimp the tubing instead of forming a tight seal to the inside of the receiving union or bulkhead fitting.
Don’t over-tighten swaged fittings. In general, use two wrenches-one to turn the nut and one to restrain the union. Tighten a new fitting assembly approximately one-half turn past finger tight, then check for leaks and retighten if necessary. It’s best to follow the individual manufacturer’s recommendations for tightening fittings. For a remade fitting that’s assembled onto the original union only one-quarter turn may be required. In any case, don’t try to force a fitting to seal by continuing to tighten it with a bigger wrench: You’ll only ruin both the nut and the union or bulkhead fitting. When in doubt it’s better to cut the tubing and make a new connection.
Never apply any type of lubricant, sealant, or polyfluorocarbon tape to the sealing surfaces of a swaged fitting-they’re designed to seal with a close metal-to-metal contact. It is appropriate to use one layer of polyfluorocarbon tape on the threads of a bulkhead union where the threads form the seal. Wrap the tape flat once around the fitting in the opposite direction of how the fitting will be installed.
Removing and Returning Used Cylinders
When the residual cylinder pressure drops below about three times the regulator outlet pressure, which is around 250 psig (1.7 MPa), it’s time to replace the cylinder. Don’t allow the internal cylinder pressure to go to zero; it will force the gas supplier to perform extra cleaning on the cylinder because they cannot assume it has not been contaminated. In addition, running down the cylinder pressure will cause the regulator’s outlet pressure first to increase slightly and then drop off toward zero, which will cause retention time and detector stability problems. First bring a new cylinder into the laboratory, and then swap the old and new cylinders as follows.
The pressure regulator must be relieved of internal gas pressure before it is disconnected; otherwise a sudden burst of gas may result. First, turn the GC thermal zones off and allow them to cool. Turn off the detectors as well. Then turn off the high-pressure cylinder valve and allow both the high-pressure and outlet pressure gauges to approach zero. It may be necessary to bleed gas off at the GC by increasing a flow or pressure setting temporarily. Next, set the pressure adjustment on the regulator fully off and close the regulator outlet valve. Turn the GC flow and pressure settings to zero to prevent air from diffusing back into the gas lines and filters. Finally, loosen and remove the regulator from the gas cylinder, and install the cylinder cap.
Carefully secure the regulator while exchanging the cylinders. A small strap or chain works well to hold it onto a neighboring device, or just place it on a flat surface. Don’t leave it hanging by the connecting tubing, which will only stress the tubing and could allow the regulator to fall some distance and be damaged.
If a regulator will be removed from use, even for a day, it should be detached from the connecting tubing and stored in a dust-free environment. If gas filters are in-line, be sure they are filled with gas and then if possible, seal the filters’ inlets and outlets before exposing the gas supply lines to the open air.
Return used cylinders promptly. Keeping empty cylinders on hand will accumulate cylinder demurrage charges and waste space that could be put to better use.
Conclusion
Laboratory workers can ensure high-pressure gas cylinder safety by following a few simple procedures and installation guidelines. Proper cylinder restraint, appropriate regulator installation and operation, and suitable connecting tubing and fittings all will yield improved safety and better GC results. Cylinder transportation is the most hazardous part of gas handling in the laboratory environment. Perhaps risky gas handling behavior is due to simple carelessness and a rush to get the instruments up and running again, but the potential cost and impact of not following safe procedures far outweighs the loss of a few minutes of productive lab time.
References
- J.V. Hinshaw, LCGC North Am. 34(10), 786–791 (2016).
- http://www.cganet.com.

John V. Hinshaw “GC Connections” editor John V. Hinshaw is a Senior Scientist at Serveron Corporation in Beaverton, Oregon, and a member of LCGC’s editorial advisory board. Direct correspondence about this column to the author via e-mail: LCGCedit@ubm.com

New Study Reviews Chromatography Methods for Flavonoid Analysis
April 21st 2025Flavonoids are widely used metabolites that carry out various functions in different industries, such as food and cosmetics. Detecting, separating, and quantifying them in fruit species can be a complicated process.
University of Rouen-Normandy Scientists Explore Eco-Friendly Sampling Approach for GC-HRMS
April 17th 2025Root exudates—substances secreted by living plant roots—are challenging to sample, as they are typically extracted using artificial devices and can vary widely in both quantity and composition across plant species.
Sorbonne Researchers Develop Miniaturized GC Detector for VOC Analysis
April 16th 2025A team of scientists from the Paris university developed and optimized MAVERIC, a miniaturized and autonomous gas chromatography (GC) system coupled to a nano-gravimetric detector (NGD) based on a NEMS (nano-electromechanical-system) resonator.

.png&w=3840&q=75)

.png&w=3840&q=75)


.png&w=3840&q=75)


.png&w=3840&q=75)


