Column Protection: Three Easy Steps
Pages 640-644
Make your column last forever? Not quite, but you can help prevent its early demise.
Sometimes it may seem like you are spending most of your laboratory budget buying liquid chromatography (LC) columns. Why can't column manufacturers make a product that lasts longer? Actually, with reasonable care, the column should be a small proportion of the total LC analysis costs. For example, a typical reversed-phase column costs somewhere around $500–600. If it lasts for 500–1000 injections, that translates to $0.50 to $1 per injection. Although the cost will vary depending on the laboratory and particular method, a cost of $50 per injection is reasonable for a routine method; this is corroborated with the pricing of such analyses by contract laboratories. So we're talking about the column making up 1–2% of the total cost of analysis. If we can do some clever procedure that doubles the column lifetime, we really haven't done much to reduce the cost of analysis, even though the price of an individual column still seems high. My personal feeling is that if you can get 500 injections through a column, it doesn't owe you anything.
In this month's "LC Troubleshooting" discussion, I'd like to examine what reasonable expectations are for column lifetimes. Then we'll look at three things we can do to help maximize the useful life of the column, some of which are almost free.
What Are Reasonable Expectations?
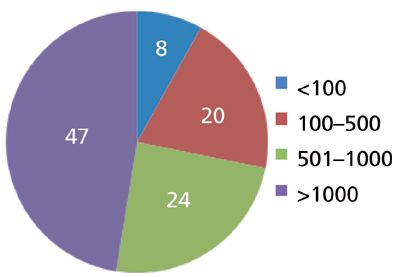
First, let's look at the experience of other chromatographers. Ron Majors, in his "Column Watch" column installments, has included the results of user surveys about various aspects of chromatography. His most recent column that applies to column lifetimes was done in 2012 (1), and will serve for the basis of the present discussion. Figure 1 is a pie chart derived from Ron's data from a 2011 survey that can be considered current experience with column lifetimes. You can see that nearly three quarters of all the respondents were able to get more than 500 injections from a column, whereas nearly half of them could make at least 1000 injections before the column failed. This seems pretty amazing to me because it includes all types of columns, not just the bulletproof 150 mm × 4.6 mm, 5-μm particle size reversed-phase column that is the workhorse of modern LC.

Figure 1: The typical number of injections obtained on an analytical LC column. Based on 2011 survey (1).
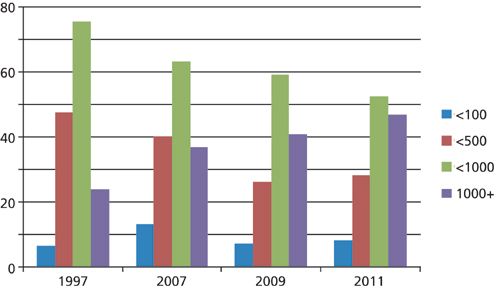
To see how experience has changed over time, I've made a comparison plot for four surveys taken from 1997 to 2011 (1), shown in Figure 2. Several trends stand out to me when I examine this plot. First, I noticed the green bars representing the percentage of users who are able to get fewer than 1000 injections made before the column fails. This drops from 76% in 1997 to 53% in 2011; the companion purple bars show that the 1000+ injection experience is trending to larger percentages. I mentioned above that I consider the 500 injection point a kind of "break-even" status for a column. You can see that the number of users that have trouble reaching 500 injections before column failure is trending downward from approximately half in 1997 to about a quarter in 2011. Finally, the number of users with terrible experiences - 100 or fewer injections before column failure - is essentially unchanged, hovering just below 10%.

Figure 2: Comparison of the typical number of injections before LC column failure over time. Based on data from reference 1.
It would be speculative to assign reasons for the changes . . . but I'm happy to speculate! I don't think column lifetimes have improved primarily because of improvements in column manufacture. It is true that at one time, column settling, or void formation, was quite common, but by the time the 1997 survey was taken, the column packing process was sufficiently mature that this mode of failure was rare. I think the main reason for longer column lifetimes is the result of a better-educated user base that translates to better sample pretreatment and physical column protection techniques. It is these column protection techniques that I would like to concentrate on for the remainder of the discussion. I also suspect that the steady state of failures at <100 injections is more a result of poor laboratory practice, as well as certain "column killing" applications, than the column itself.
Don't Inject Junk
In the LC classes that I teach, I often joke that the best way to extend column life is to never open the column box. Once you start injecting samples, you start the column down the road to failure. The sample can affect the column in two primary ways - chemical and physical. The better the job we do at removing unwanted chemical contaminants and particulate matter from the samples, the longer our column will last. Removal of chemical contaminants through solid-phase extraction (SPE), liquid–liquid extraction, and other techniques is a regular part of the "Sample Prep Perspectives" column that appears regularly in LCGC, and I will not deal with it in any detail here. Suffice it to say that the more sample pretreatment that is undertaken, the fewer unwanted contaminants get to the column, and the longer the column will last. You have to balance the cost of sample pretreatment against its benefits. For example, by the time you buy the cartridges and reagents and add in the cost of your time, you can easily spend $5 or more per sample for SPE; this is approximately five times the cost contribution of a reversed-phase column that lasts for 500 injections. You would have to extend the column life from 500 to 2500 injections just to break even. On the other hand, if you are injecting plasma samples and don't do any pretreatment, the column will likely fail in less than 10 injections. You also have to consider improvements in data quality when extensive sample pretreatment is used. I know that in our laboratory, such efforts often allowed us to collect usable data at lower concentrations and to get more consistent results than was possible with less pretreatment.
Whether or not you perform other pretreatment steps on your sample, nearly every sample will benefit from sample filtration, centrifugation, or both. Samples can be filtered through a disposable membrane filter to remove fine particulate matter that might block the frit at the inlet of the column. The filter porosity should be no larger than that of the inlet frit on the column. Most columns containing packing particles >3 μm in diameter will use 2-μm porosity frits; 3-μm particle columns typically use 0.5-μm frits, and <3-μm particle columns, such as used for ultrahigh-pressure LC (UHPLC), typically use 0.2-μm porosity inlet frits. The most popular sample filter is 0.45-μm porosity (often referred to as 0.5 μm), and this will be sufficient for all columns except the ones packed with sub-2-μm particles, where 0.2-μm filters will be needed. Filters are available as preassembled cartridges that fit on a disposable syringe, or as filter plates in a 96-well format. Even though these filters usually are effective, I'm not a strong proponent of them. At least four aspects discourage me from filtering samples. First, filters are expensive - last time I priced them, they were more than $0.50 each when purchased 1000 at a time - this can be as expensive as the column in the overall cost of analysis. Second, filtering is a slow process with 0.5-μm filters and extremely slow with 0.2-μm ones. Third, if you are working in a regulated environment, you must treat every sample in the same manner. This means that if you filter one sample, you have to filter every sample, whether it is needed or not. Finally, if you have to validate your LC method, you have to validate the filtration process. You always lose sample volume with a filter - if you put 50 μL of sample on the filter, you will get less sample out the other end. You have to show that the sample is not selectively lost, especially at high or low concentrations. So, you can see that using sample filters is a lot of work and can be expensive. But if you are willing to go to the trouble and expense, sample filtration will improve column lifetimes in most cases.
An alternative (or supplement) to sample filtration is to centrifuge the samples before injection. This is a simple and relatively inexpensive process. Just put the samples in centrifuge vials, Eppendorf tubes, or a 96-well centrifuge plate and place the samples in a benchtop centrifuge. Turn the speed up to its maximum setting and spin the samples for 5–10 min. This will cause particles that might otherwise block the column frit to settle to the bottom of the vials. Transfer the samples to injection vials or plates and proceed with analysis. We used this technique for years in our laboratory with precipitated protein samples and rarely had a particulate-matter-related problem. I have seen examples with UHPLC where even after 0.2-μm filtration, the sample was still a bit cloudy and caused column blockage, whereas if the cloudy sample was centrifuged to clarify it before injection, column blockage problems were eliminated.
Use an In-Line Filter
I strongly believe that an in-line filter is the least expensive addition to your LC or UHPLC system and the one that will provide the maximum return on investment. These filters are simply a modified tube fitting that contains a filter of specified porosity and is mounted between the autosampler and the column (or guard column, if one is used). The most popular configuration is a stainless steel fitting approximately 1.5 cm in diameter and 2.5-cm long containing a replaceable frit of 0.5- or 0.2-μm porosity. An alternative is a polyetheretherketone (PEEK) finger-tightened fitting that contains a frit of similar porosity. The PEEK fitting is disposable, but because it is more expensive than the disposable frit in the stainless steel fitting, it will be more costly over time. The in-line filter is selected to be of smaller porosity than the column frit, so that it will become blocked before the column does. When the system pressure starts to rise, you know that the in-line frit is becoming blocked and will need to be replaced before it is totally blocked.
The in-line filter performs a similar action as the individual sample filters, but requires no extra work during sample pretreatment. If you centrifuge your samples and occasionally allow a bit of particulate matter through the process, it will get caught downstream in the in-line filter. Another advantage of the in-line filter is that it is quick and easy to change - if you have good manual dexterity, you can shut off the pump, change the filter, turn on the system, and be back in business within 5 min. You may want to reinject a system suitability sample to reassure yourself that nothing else is wrong, but the in-line filter will not require the extensive conditioning and recalibration that may be required when a guard column is replaced. A final benefit of the in-line filter is that it will catch particulate matter generated when pump seals and injection valve rotors wear, so these don't block the column. I strongly recommend installing an in-line filter on every LC system in the laboratory, even if you are using guard columns.
The Guard Column
A guard column (also called a precolumn) is a short chromatographic column placed just upstream from the analytical column. This column typically is 10–20 mm long, contains packing material matched to the analytical column, and uses inlet and outlet frits that are no larger than those in the analytical column. The guard column has a twofold function. First, the frit at its inlet traps particulate matter that might otherwise block the analytical column. Second, the packing material is matched to the analytical column, so it should trap materials that might otherwise become strongly or irreversibly bound to the analytical column.
It is well known that guard columns will extend the lifetime of the analytical column. However, there are some potential problems with guard columns. First, they are rather expensive - they can cost 40% or more of the price of an analytical column - do you gain sufficient column lifetime to justify the cost? Second, how long does a guard column last? You have to determine when to replace it so that the chemical contaminants collected on the guard column don't bleed onto the analytical column. So, you need to count injections or determine a system performance test to determine when to replace the guard column. Third, you need to determine how to wash the guard column. Does it need to be washed separately from the analytical column to prevent flushing contaminants onto the analytical column? And finally, you might expect that adding a 20-mm guard column to a 150-mm analytical column would improve its efficiency by approximately 10%, but this is rarely the case. The reason is that attaching the guard column will add two fittings and a piece of tubing to the system plumbing and that the guard column is not packed as well as the analytical column, both of which tend to drag down the performance of the system. The result is that if you are lucky, you'll break even in terms of theoretical plates when adding a guard column, but it is more likely that you may lose a little column efficiency.
The choice to use a guard column is yours. They definitely will extend the analytical column lifetime, but I personally don't think they are worth the trouble or expense in most cases. If you do choose to use a guard column, I still recommend using an in-line filter between the autosampler and guard column. The filters cost a small fraction of the cost of a guard column, and will extend its life, just as it would for an analytical column.
Summary
Although you can't make your analytical column last forever, there are some simple actions you can take to extend the life of this expensive part of the system. First, pretreat the samples as required. The final step of sample pretreatment should be filtration or centrifugation. Second, use an in-line filter to protect the guard column or analytical column from blockage because of particulate matter in the sample or elsewhere in the system. Third, if it makes sense for your application, use a guard column to protect the analytical column. Finally, be sure to flush the column with strong solvent at the end of each batch of samples to remove any strongly retained materials.
References
(1) R.E. Majors, LCGC North Am.30(1), 20–34 (2012).
John W. Dolan "LC Troubleshooting" Editor John Dolan has been writing "LC Troubleshooting" for LCGC for more than 30 years. One of the industry's most respected professionals, John is currently the Vice President of and a principal instructor for LC Resources in Walnut Creek, California. He is also a member of LCGC's editorial advisory board. Direct correspondence about this column via e-mail to John.Dolan@LCResources.com

John W. Dolan

Free Poster: NDSRI Risk Assessment and Trace-Level Analysis of N-Nitrosamines
April 25th 2025With increasing concern over genotoxic nitrosamine contaminants, regulatory bodies like the FDA and EMA have introduced strict guidelines following several high-profile drug recalls. This poster showcases a case study where LGC and Waters developed a UPLC/MS/MS method for quantifying trace levels of N-nitroso-sertraline in sertraline using Waters mass spectrometry and LGC reference standards.
New Guide: Characterising Impurity Standards – What Defines “Good Enough?”
April 25th 2025Impurity reference standards (IRSs) are essential for accurately identifying and quantifying impurities in pharmaceutical development and manufacturing. Yet, with limited regulatory guidance on how much characterisation is truly required for different applications, selecting the right standard can be challenging. To help, LGC has developed a new interactive multimedia guide, packed with expert insights to support your decision-making and give you greater confidence when choosing the right IRS for your specific needs.
Using the Carcinogenic Potency Categorisation Approach (CPCA) to Classify N-nitrosamine Impurities
April 25th 2025Learn how to manage nitrosamine impurities in pharmaceuticals with our free infographic. Discover how the CPCA approach establishes acceptable intake limits and guides the selection of NDSRI reference samples. Stay compliant and ensure safety with our ISO-accredited standards.

.png&w=3840&q=75)

.png&w=3840&q=75)


.png&w=3840&q=75)


.png&w=3840&q=75)


