The LCGC Blog: Drive It Like You Stole It–Getting the Most from Your GC Quadrupole MS
This time I’m going to be looking at how to get the most from your GC–MS (Gas Chromatography–Mass Spectrometry) system, and I intend to keep things as simple as possible, however I also make no apology in the fact that some of the concepts may be beyond your current understanding. My intention here is to explain some of the basics so that you will be able to use your instrumentation to best effect.
This time I’m going to be looking at how to get the most from your GC–MS (Gas Chromatography–Mass Spectrometry) system, and I intend to keep things as simple as possible, however I also make no apology in the fact that some of the concepts may be beyond your current understanding. My intention here is to explain some of the basics so that you will be able to use your instrumentation to best effect.
Let’s start with a very basic tutorial on how MS detectors for GC as shown in Figure 1.

Figure 1: Schematic diagram of the major components of a Quadrupole Mass Analyzer
Once introduced into the detector (in the gas phase) at a suitable linear velocity, we subject analytes to a steam of electrons which causes them to formation radical cations (.+) through the loss of an electron, which frequently then undergo fragmentation to stabilize the energy imparted by the ionizing electrons. We then accelerate these radical species and fragments out of the ion source and focus the charged fragments using electrostatic lenses into the entrance of the quadrupole mass analyzer.
We apply various voltages to the mass analyzer to create electrostatic fields inside the analyzer which cause the various ions to process (move) in a defined way through the mass analyzer-allowing them to remain within the influence of the electrostatic field, or to collide with the “poles” of the mass analyzer or be lost from the electrostatic field, between the poles and remain undetected. This “sorting” of ions is based on their mass to charge ratio (m/z) and those which remain in the electrostatic field will be transported through the analyzer to the detector.
By selectively changing the voltages applied the quadrupole rods, we can change the non-collisional m/z and therefore “scan” through a range of m/z values, recording their relative intensity as we go.
Ok-basic outline of the process complete.
So I’ve described several electrostatic elements and applied voltages in the GC-MS process and it follows that we need to ensure that the ion production and transmission through the analyzer produces the right ions, in the right quantities (relative and absolute) and are measured at the correct mass values by the detector. Not easy, which is why the majority of us rely on an Autotune routine, developed by the manufacturer, to ensure the instrument is performing as it should. Indeed, several different Autotune routines may be available depending upon our requirements-high sensitivity, high(er) resolution, better sensitivity at higher or lower mass, qualitative versus quantitative applications, and so on.
Here’s where I have a problem. I know that using an Autotune routine helps to ensure consistency between operators and laboratories, certainly adds rigor to the resulting data and is looked upon favorably by the regulators, but is it necessary to use the manufacturers Autotune routine? As I’ll explain below, these are typically designed to show the instrument in its best light over a huge number of application areas, and even where different Autotune routines are available, in my experience these are poorly understood and little utilized.
But here’s the good news. The vast majority of systems will allow you to adjust tuning targets to build your own Autotune routines (using targets that better suit your analysis) and to develop and save sets of detector conditions (tune values) which you know will give you optimum performance for your analyses. All of this can be done with the same level of rigor associated with manufacturers’ Autotune routines and which will ultimately give you better results-all you need is a basic understanding of the working principles of the instrument-which is what I’m hoping to achieve with this installment.
So first we have to get the cations that we have created (psedomolecular ion and fragments) out of the ion source and into the lens stack for focusing and this is usually achieved by a repeller element or an accelerating voltage. For simplicity let’s say we are dealing with a repeller voltage, and of course this will be positively charged to repel (see what we did there?) the ions out of the ion source. But before we consider how this voltage might be optimized, we need to understand a little more about the tune compound which is infused (in the gas phase) into the mass analyzer.
Most manufacturers use a compound called Perfluorotributylamine (PFTBA / FC-43 / heptacosafluorotributylamine) which is (C4F9)3N which has several very useful properties. It’s a volatile liquid at room temperature and pressure but a gas under the temperature and pressure conditions in the detector, it fragments in a predictable way to yield ions over a wide mass range with predictable mass fragments of reproducible relative abundance. As it’s per-fluorinated, it means that we don’t run into problems with the mass deficit complications that we see when analyzing compounds containing multiple hydrogen atoms. The PFTBA ions that are typically chosen to tune the instrument have m/z values of 69, 219, and 502 and are chosen because they cover a wide mass range (good for calibrating a large part of the mass axis) and they cover a wide abundance range. Unlike LC–MS it’s not possible to infuse a solution of our analyte to optimize the detector response–primarily because of the need to constantly infuse the tune compound, at a steady concentration, in the gas phase.
So back to the repeller voltage optimization. The Autotune routine will set the analyser to detect ions of m/z 69, 219, and 502 in order and for each ion, it will adjust the voltage on the repeller and record the abundance of each ion over the voltage range. A typical schematic outlining this process is shown in Figure 2.
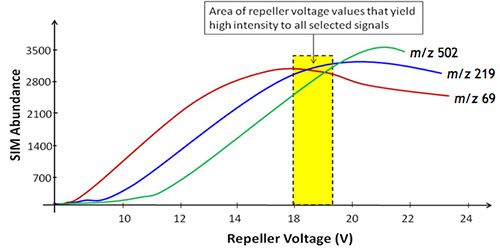
The instrument Autotune will most likely set a voltage for the repeller at a value within the yellow box (18–19V) shown on Figure 2. Which is fine if we want to record results across a wide mass range (for qualitative analysis or library searching of compounds which readily fragment for example). But what if we wanted to quantitatively analyze a compound whose pseudomolecular ion or a major fragment was at the higher end of the mass range. I hope you can see that by adjusting the repeller voltage to 21V, then the abundance of the signal may rise by around 30%, as shown by the green line in Figure 2, which shows the voltage response of the tune compound fragment ion of m/z 502. So this gets you 30% more sensitivity and ramping the voltage of various ions from the tune compound and manually selecting the value which gives the optimum response is possible in most MS detectors.
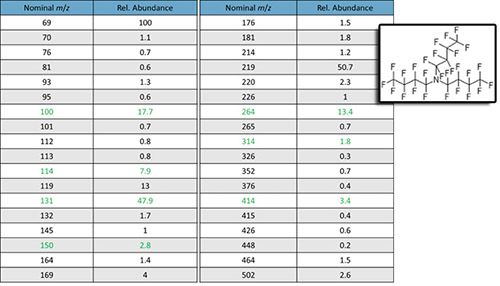
Further, what if none of the chosen tune ions is close in mass (most ions in GCMS are singly charged and therefore the value for “z” will be 1 in most cases) to our target analytes, then we might want to choose another ion for tuning, which is possible in many systems via the operating software. One would want to choose a relatively highly abundant ion in most cases, but this isn’t strictly necessary. I’ve listed the usable ions from PFTBA in Figure 3 and it should be possible to select any of these ions to use during the tune of your instrument, although the ions highlighted in green are particularly useful at filling in those all important gaps in the mass range.
One final point on the repeller (or accelerating voltage) is that this is a great parameter to track source cleanliness. Put bluntly, the dirtier the component, the higher the voltage required to push the ions out of the source–so use this parameter to set flags and limits for your source cleaning and avoid using the detector voltage (as most people do) as this can be confusing and not necessarily indicative of source cleanliness.
So there are lots of other lenses and components in the source which may also be manipulated to optimize response, however, these make a minor difference to sensitivity or resolution when tweaked from the Autotune, so I’m not going to include these here, but it’s always a good idea to consult manufacturers literature to know how to manipulate them should you need to.
The next element that we can really tune is the mass analyzer and so again a (very) brief overview of the operating principle is useful.
As described above, we apply 2 voltages to each rod within the quadrupole one of which is AC and the other DC to create an electrostatic field which causes the ions to process as they move through the analyzer under the influence of another potential which is applied to the front and rear end of the analyzer. The important voltages are shown in Figure 4, suffice to say that U is the DC (sometimes called Fixed or Offset voltage) and V is the AC (sometimes called the Rf as the frequency of oscillation is in KHz).
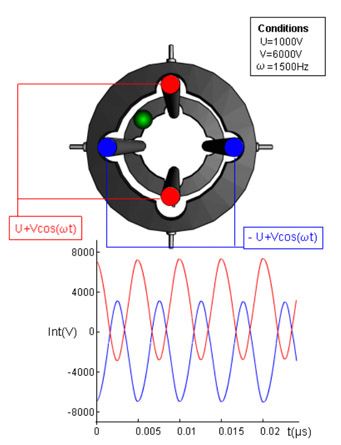
The voltages can be fixed to record a particular m/z value or scanned to measure m/z values in a sequential fashion. So from this you should realize that certain combinations of U and V can be mapped against the values of m/z which would be allowed to successfully pass through the analyzer and be detected. These stable combinations of U and V are shown in Figure 5, and ANY value under the curve (peak) for each of the masses will allow the ions to pass through.
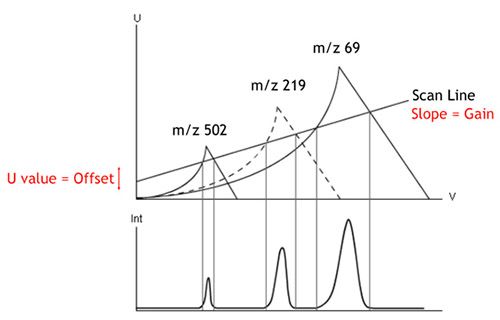
From Figure 5 you should see the MS peaks within the lower part of the figure and how they relate to the various values of U and V that we apply to the mass analyzer.
The two important aspects from an instrument operation perspective are the Offset (the U or DC value) and the slope of the scan line (effectively U/V). In all but the most rudimentary instruments these values can be altered by the user and Figure 6 shows what happens when we do this.
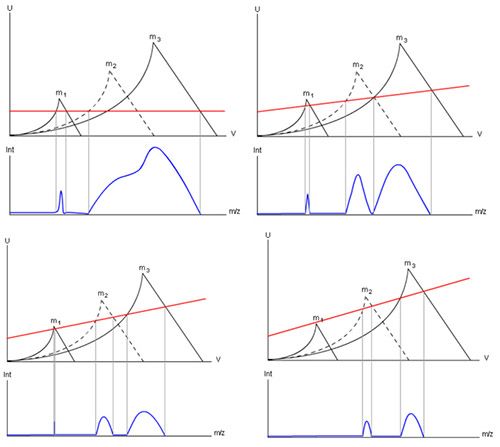
As we increase the gain value applied to quadrupole, I hope you can see that resolution between the masses of interest increases and that intensity of the response decreases. So, quite simply, we can use the gain setting of the instrument to improve the resolution for qualitative work or the response (intensity) for quantitative work (be sure to check that there are no interfering ions before detuning the resolution just in case you get issues with quantitation). You’ll need to empirically investigate these effects but again most instruments will allow you to do this “on the fly” with selected ions from the PFTBA tune compound (for example, you don’t need to stick to the 69, 219, and 502 ions). You will quickly notice that changing the gain has a larger effect on either lower or (more usually) higher mass values and also note that in some circumstances you can lose a peak if you go outside the allowable combinations of U and V.
Changing the offset value also has a similar effect, shown in Figure 7, but the effect is seen equally across all masses–so you can use a combination of Gain and Offset to achieve the required resolution or sensitivity across the range of masses that you will be measuring.
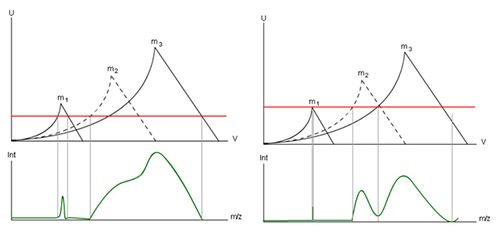
Just to reiterate, adjusting Gain and Offset (different manufacturers use different names for these parameters) allows you to tune the instrument for higher resolution or sensitivity depending upon your application type.
When I’m teaching these topics, I always joke that no matter what happens I can get better instrument performance from the instrument than the Autotune, and sometimes this can be a factor of 10 difference. I’m glad to say that I haven’t been proved wrong yet. So, if you have the inclination and a little time to invest, you can optimize the tuning of the instrument and save these tune values so that other users can also benefit from the improved instrument performance.
One last point; don’t use detector voltage (electron multiplier voltage for example) to improve sensitivity, because it has a very limited effect. While it may boost the intensity of the signal for a particular ion, it will also boost the noise similarly and the actual improvement in signal to noise is usually minimal.
Have fun pimping your ride-and let me know if you manage to beat the machine!

Tony Taylor is the technical director of Crawford Scientific and ChromAcademy. He comes from a pharmaceutical background and has many years of research and development experience in small molecule analysis and bioanalysis using LC, GC, and hyphenated MS techniques. Taylor is actively involved in method development within the analytical services laboratory at Crawford Scientific and continues to conduct research in LC-MS and GC-MS methods for structural characterization. As the technical director of the ChromAcademy, Taylor has spent the past 12 years as a trainer and developing online education materials in analytical chemistry techniques.
The LCGC Blog: Historical (Analytical) Chemistry Landmarks
November 1st 2024The American Chemical Society’s National Historic Chemical Landmarks program highlights sites and people that are important to the field of chemistry. How are analytical chemistry and separation science recognized within this program?
